Difference between revisions of "Belt Sander Sanding Station"
(→Basic Instructions) |
(→Basic Instructions) |
||
| Line 38: | Line 38: | ||
== Basic Instructions == | == Basic Instructions == | ||
| − | + | [http://manuals.harborfreight.com/manuals/97000-97999/97181.pdf Manual - OEM Instruction Manual ] | |
| Line 46: | Line 46: | ||
#. When using the Disc Sander, only use the LEFT side of the Sanding Disc (as you face it) to sand. The Sanding Disc turns counterclockwise and using the right side could cause kickback. | #. When using the Disc Sander, only use the LEFT side of the Sanding Disc (as you face it) to sand. The Sanding Disc turns counterclockwise and using the right side could cause kickback. | ||
# Use two hands and hold workpiece securely against the fence/table at all times. Press the workpiece against the belt/disc to start sanding. Keep the workpiece moving for a better finish. | # Use two hands and hold workpiece securely against the fence/table at all times. Press the workpiece against the belt/disc to start sanding. Keep the workpiece moving for a better finish. | ||
| − | # After use, turn off the tool, remove the Safety Key from the Switch, and disconnect from the power supply. Clean and store the | + | # After use, turn off the tool, remove the Safety Key from the Switch, and disconnect from the power supply. Clean and store the tool indoors out of children's reach |
| − | tool indoors out of children's reach | ||
== Advanced Operational Knowledge == | == Advanced Operational Knowledge == | ||
Revision as of 08:25, 21 June 2015
- Owner/Loaner: Randy Keeling
- Serial Number: Serial Number
- Make/Model: Make/Model of equipment
- Arrival Date: Sept 2014
- Usability: {{{usagerestrictions}}}
- Contact: info@themakerstation.com
- Where: Back wall near roll up door
Contents
Info
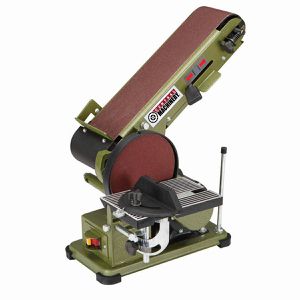
4" x 6" Combination sander with adjustable belt sands inside and outside curves.
General Specs
- 6 in. disc 1819 rpm
- 4 x 36 in. belt 1185 fpm
- Cast aluminum table tilts to 60° for use with belt or disc
- 3/4 HP motor
- Miter gauge for beveling
Permissions
- For general use by members.
- Treat equipment as if it were your own and put away as or better than you found it.
Restrictions
- Safety glasses required
- Closed toed shoes required
- No long sleeves or loose clothing
- Long hair must be tied back
Basic Instructions
Manual - OEM Instruction Manual
- Make sure that the Switch is in the off-position, then plug in the tool.
- Insert Safety Key into Switch.
- Make sure nothing is contacting the Sanding Disc or Belt, then turn on the Switch.
- . When using the Disc Sander, only use the LEFT side of the Sanding Disc (as you face it) to sand. The Sanding Disc turns counterclockwise and using the right side could cause kickback.
- Use two hands and hold workpiece securely against the fence/table at all times. Press the workpiece against the belt/disc to start sanding. Keep the workpiece moving for a better finish.
- After use, turn off the tool, remove the Safety Key from the Switch, and disconnect from the power supply. Clean and store the tool indoors out of children's reach
Advanced Operational Knowledge
There are some more advanced tasks that not everyone needs to know to do XXXXX, but needs to know to troubleshoot:
- x
- y
Warnings
- Keep loose hair and sleeves away from all moving parts
- Beware parts may become hot after use
- Beware of dust, fumes, choking hazards
Safety
FILL THIS OUT THOROUGHLY
- x
- y.
References
- links as needed
