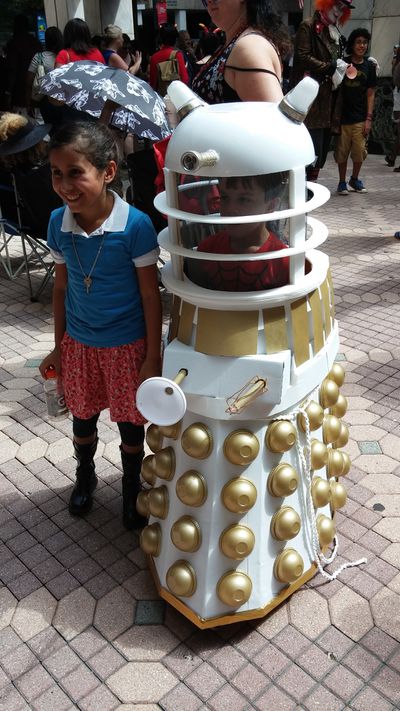
Cardboard Dalek
Revision as of 06:03, 17 June 2015 by Julieonefive (talk | contribs)
I built the cardboard Dalek as a costume for my six-year old son to wear at DragonCon, 2014.
Project Dalek
I based my design on plans and build diaries at Project Dalek.
Project Dalek consists of three main things:
- Website with Dalek plans
- Builders Workshop Manual This is only available in hardcopy by mail because of too many re-postings. The ordering process isn't apparent when you first register with the site, but it's worth every minute and every penny (on the order of $30).
- Forum This consists mainly of build diaries and discussions. There's a lot of information, but it's scattered over so many dairies, it can be hard to find what you need. Once you find a good diary though, you can follow it and get some good discussions going.
Main modifications
- Scale: 75%
- Extended skirt "prism" up through top of shoulders, so I wouldn't have to build a separate section. The skirt isn't a true prism, which meant it was warped a little. Further, the shoulders on a real Dalek don't follow these prism lines, so my shoulders are aren't the right shape. The front of the base tip curled up off the ground a bit, but with the Dalek standing on 3 wheels, it wasn't an issue.
- The rings are spaced way further apart than would be true to scale. I wanted the top of the shoulders to be at my son's shoulders. Once that was built, I realized we needed more head clearance for comfort. So that part is way off.
- For the bottom bumper, I just added strips of cardboard (carefully measured and cut mind you), and covered it with gold duck tape. The gold didn't match my gold paint, but it was so low down it wasn't noticeable.
Materials
| Dalek Part | Materials | Comments |
| Skirt | Cardboard | I used cardboard from my kids' old science fair displays. You could still see the writing on the inside! |
| Hemispheres | Dessert cup lids Rustoleum gold spray paint & primer Foam core board circles |
The edge of the dessert cup lids was too thin to glue down. For each hemi, I cut two equal sized circles from foam core board, glued them into the lid (resting the way the top of a cup would under the lid), and glued the circles to the painted skirt. |
| Shoulders | Cardstock Foam core board |
I wrapped cardstock around the top of the extended prism, and trimmed it to size. I glued rectangles of foam core board down to build out the bumper sections, and glued cardstock to the tops and outer edge of the foam core. |
| Shoulder slats | Carstock Gold spray paint |
I was getting pretty tired at this point. I did cut the slats to the scale size, but had to fudge a little around the gunbox. |
| Neck/rings | Meter sticks Foam core board Screen Binder clips |
This section wasn't nearly sturdy enough. The plans call for an actual structure inside, which I didn't do. In the house it looked fine, but when it was wobbling down the street, I was sure this section was going to crumble under weight of the dome. |
| Dome | Punch bowl | I found this punch bowl at Party City. It was a little small for the given scale, but I strayed from scale from the shoulders on up. I used a dremel to cut off the bottom support and the outer lip, and to cut the hole for the eye stalk. |
| Dome Lights | Puck lights from the Dollar Tree Small plastic jars from Michaels White spray paint |
I lightly sprayed the inside of the jars with white spray paint. I glued a thin circle of plastic to the opening of the jar, with an X cut into the plastic. This allowed the thin plastic to fit the contour of the top of the puck light. Painted the puck light with gold craft paint (was silver) |
| Eye Stalk | Flashlight from the Dollar Tree | Hot glued the flashlight into a hole in the dome. Painted the flashlight with gold craft paint (was silver). |
- The lights are top were puck-lights from the dollar store, with craft store storage jars glued on top of them. The lights were too cheap, so they didn't stay on, but it was still cool.
- The eye was an LED flashlight (again, the dollar store). It wasn't true to the design, but my son loved it!
If I do it again
- I'll make the supports for the rings and head more sturdy. Some of the sidewalks were paved with rough pavers, and I thought the dome was going to shimmy right off!
- I'll make a stronger one! The parade was crowded and the sidewalks were rough. I spent half the time worrying it was going to get crushed.
- Instead of watching the parade, we'll try to be in it. We got such a good response, we would have like to share it with more people. But little guy tired out and didn't make it to the costume/character show-off area.
