Difference between revisions of "Experiments Party Theme"
Julieonefive (talk | contribs) |
Julieonefive (talk | contribs) (→Experiments) |
||
| (35 intermediate revisions by the same user not shown) | |||
| Line 13: | Line 13: | ||
</table> | </table> | ||
| − | == | + | ==Test Tubes, Containers, Pipettes== |
<table border=1 cellspacing=0 cellpadding=5> | <table border=1 cellspacing=0 cellpadding=5> | ||
<tr> | <tr> | ||
| − | + | <td>Item</td><td>Supplier</td><td>Comments</td> | |
</tr> | </tr> | ||
<tr> | <tr> | ||
| − | |||
<td>Baby Soda Bottle Test Tubes</td> | <td>Baby Soda Bottle Test Tubes</td> | ||
<td>[http://www.hometrainingtools.com/giant-test-tubes-30-pack Home Science Tools]</td> | <td>[http://www.hometrainingtools.com/giant-test-tubes-30-pack Home Science Tools]</td> | ||
| − | <td>These are soda bottles that haven't yet been vacuum formed into large bottles. They're clear, sturdy, and wash up well. The lids are soda bottle lids, so they're easy to replace if you loose one. The lids that came with these weren't as nice as the lids that came our science kit versions.</td> | + | <td>These are soda bottles that haven't yet been vacuum formed into large bottles. They're clear, sturdy, and wash up well. The lids are soda bottle lids, so they're easy to replace if you loose one. The lids that came with these weren't as nice as the lids that came in our science kit versions, but they worked.</td> |
</tr> | </tr> | ||
| Line 30: | Line 29: | ||
<td>Self Standing Centrifuge Tubes, 50ml</td> | <td>Self Standing Centrifuge Tubes, 50ml</td> | ||
<td>[http://www.amazon.com/gp/product/B00FGDUNRG?psc=1&redirect=true&ref_=oh_aui_detailpage_o05_s00 Frey Scientific through Amazon]</td> | <td>[http://www.amazon.com/gp/product/B00FGDUNRG?psc=1&redirect=true&ref_=oh_aui_detailpage_o05_s00 Frey Scientific through Amazon]</td> | ||
| − | <td>These are nice, because they stand up on their own. They'd still be easy enough for kids to tip over, so I still recommend making the diy test tube racks. They're not as clear as the baby soda bottles, but they have ml | + | <td>These are nice, because they stand up on their own. They'd still be easy enough for kids to tip over, so I still recommend making the diy test tube racks. They're not as clear as the baby soda bottles, but they have ml marks from 5ml to 50ml, which my son liked.</td> |
</tr> | </tr> | ||
| Line 46: | Line 45: | ||
</tr> | </tr> | ||
| + | |||
| + | |||
| + | |||
| + | </table> | ||
| + | |||
| + | ==Project: DIY Test Tube Stands== | ||
| + | |||
| + | [[File:diytesttubeholder.jpg|400px|align]] | ||
| + | <table border=1 cellspacing=0 cellpadding=5> | ||
| + | |||
| + | <tr> | ||
| + | <td>Item</td><td>Supplier</td><td>Comments</td> | ||
| + | </tr> | ||
<tr> | <tr> | ||
| − | + | <td>Tall Food Storage Tubs</td> | |
| − | <td>Food Storage Tubs</td> | ||
<td>Dollar Tree</td> | <td>Dollar Tree</td> | ||
| − | <td> | + | <td>The tubs I used were SureFresh brand, size "tall square." They were clear, around 3 1/2 inches tall, and a three-pack was $1.</td> |
</tr> | </tr> | ||
<tr> | <tr> | ||
<td>White Spray Paint</td> | <td>White Spray Paint</td> | ||
| − | <td> | + | <td>already had</td> |
<td>I foolishly bought spray paint for a project that was *much* too large for spray paint, so I had quite a few of these sitting around waiting to be used. I used it to paint the green lids on the food storage tubs. The lids make the test tubes stand/stay much better, but the green color of the lids made it hard to see the liquids in the test tubes, so the white paint came in handy. Alternatively, you could use white paper, but it'll get soggy pretty quickly.</td> | <td>I foolishly bought spray paint for a project that was *much* too large for spray paint, so I had quite a few of these sitting around waiting to be used. I used it to paint the green lids on the food storage tubs. The lids make the test tubes stand/stay much better, but the green color of the lids made it hard to see the liquids in the test tubes, so the white paint came in handy. Alternatively, you could use white paper, but it'll get soggy pretty quickly.</td> | ||
</tr> | </tr> | ||
| + | |||
| + | <tr> | ||
| + | <td>Rotary Cutting Tool (Dremel)</td> | ||
| + | <td rowspan=4>already had</td> | ||
| + | <td rowspan=4>Used the rotary cutting disk to cut the holes in the storage containers, and the sander to smooth and round out the edges. Use eye protection and don't let anyone crowd you, because hot melted plastic will fly as you work.</td> | ||
| + | </tr> | ||
| + | |||
| + | <tr> | ||
| + | <td>Dremel cutting disk</td> | ||
| + | </tr> | ||
| + | |||
| + | <tr> | ||
| + | <td>Dremel sanding barrel</td> | ||
| + | </tr> | ||
| + | |||
| + | <tr> | ||
| + | <td>Eye Protection</td> | ||
| + | </tr> | ||
| + | |||
| + | |||
</table> | </table> | ||
| − | == | + | ==Experiments== |
| + | |||
| + | |||
| + | <table border=1 cellspacing=0 cellpadding=5> | ||
| + | <tr> | ||
| + | <td>Experiment</td> | ||
| + | <td>Ingredients</td> | ||
| + | <td>Starter recipe</td> | ||
| + | <td>Party recipe</td> | ||
| + | <td>Instructions</td> | ||
| + | </tr> | ||
| + | |||
| + | <tr> | ||
| + | <td rowspan=2>Sour Milk<br> <br><i>Test tube, dropper</i></td> | ||
| + | <td>Milk</td> | ||
| + | <td> </td> | ||
| + | <td>By the drop</td> | ||
| + | <td rowspan=2> | ||
| + | <b>What you'll get:</b> The milk will solidify on contact with the apple juice, and it'll look like pieces of torn up paper towel. You don't want the kids to add to much milk at once, because the whole tube will become a solid mass, and they won't be able to see the white parts are a solid floating in a liquid. | ||
| + | <ul> | ||
| + | <li>Pour apple juice into the test tubes.</li> | ||
| + | <li>Have kids use droppers or disposable pipettes to add a few drops of milk to the apple juice.</li> | ||
| + | </ul> | ||
| + | </td> | ||
| + | </tr> | ||
| + | |||
| + | <tr> | ||
| + | <td>Apple juice</td> | ||
| + | <td> </td> | ||
| + | <td>Test tube, mostly full</td> | ||
| + | </tr> | ||
| + | |||
| + | <tr> | ||
| + | <td rowspan=2>Fizz<br> <br><i>2 test tubes, small pitchers</i></td> | ||
| + | <td>Vinegar</td><td>1/4 cup</td><td>2/3 test tube</td> | ||
| + | <td rowspan=2> | ||
| + | <b>What you'll get:</b> The baking soda and vinegar will foam - a lot! | ||
| + | <ul> | ||
| + | <li>Work with test tubes on a tray or in a bowl, because there will be a lot of overflow. (Think science fair volcano.)</li> | ||
| + | <li>Have each kid scoop dry baking soda into a test tube. Try to keep them less than half full.</li> | ||
| + | <li>Have a few dollar tree pitches of vinegar ready, and fill a second test tube with vinegar for each kid.</li> | ||
| + | <li>Ask the kids to pour the vinegar into the test tube. Be ready to do vinegar refills.</li> | ||
| + | <li>Hard part: having all of the kids wait until everyone has vinegar.</li> | ||
| + | </ul> | ||
| + | </td> | ||
| + | </tr> | ||
| + | |||
| + | <tr> | ||
| + | <td>Baking Soda</td> | ||
| + | <td>2 tablespoons</td> | ||
| + | <td>Kids' choice</td> | ||
| + | </tr> | ||
| + | |||
| + | <tr> | ||
| + | <td rowspan=4>Alka Seltzer Lava Lamp<br> <br>1 Liter bottle, kids share</td> | ||
| + | <td>Water</td> | ||
| + | <td>1/3 of a 2-liter</td> | ||
| + | <td>Few inches in a 1-liter bottle</td> | ||
| + | <td rowspan=4> | ||
| + | <b>What you'll get:</b> This will look a little like a lava lamp. Each Alka Seltzer tablet will last a minute or so, so you'll want to have plenty on hand so the kids can keep it going. They'll of course realize that more is messier, so you may end up with an overflow. | ||
| + | <ul> | ||
| + | <li>Overflows are possible. Plan to have kids work with the soda bottles on a tray or in a bowl.</li> | ||
| + | <li>Pour water into a 1-liter bottle, at least a couple of inches above the base.</li> | ||
| + | <li>Add a few drops of food dye, and swirl it around.</li> | ||
| + | <li>Gently pour the vegetable oil into the bottle. DON’T SHAKE IT.</li> | ||
| + | <li>Have kids drop alka seltzer tablets into the bottles, broken in half so they’ll fit.</li> | ||
| + | </ul> | ||
| + | </td> | ||
| + | </tr> | ||
| + | |||
| + | <tr> | ||
| + | <td>Vegetable oil</td> | ||
| + | <td>2/3 of a 2-liter</td> | ||
| + | <td>Most of the rest of the bottle</td> | ||
| + | </tr> | ||
| + | |||
| + | <tr> | ||
| + | <td>Food coloring</td> | ||
| + | </tr> | ||
| + | |||
| + | <tr> | ||
| + | <td>Alka Seltzer (generic fine)</td> | ||
| + | <td></td> | ||
| + | <td>Big box (72 count)</td> | ||
| + | </tr> | ||
| + | |||
| + | <tr> | ||
| + | <td rowspan=3>Slime</td> | ||
| + | <td>Elmer's school glue (some generics don't work</td> | ||
| + | <td colspan=3 rowspan=3>I didn't like the recipe I used. It called for too much borax (3 tsp/cup), so the slime turned pretty solid pretty fast. Even if you added the borax solution slowly, the glue solution that it came in contact with quickly solidified, but the kids still loved it. Since then I found another recipe that called for 1 tsp/cup, but I haven't tested it.</td> | ||
| + | </tr> | ||
| + | |||
| + | <tr><td>Warm water</td></tr> | ||
| + | <tr><td>Borax</td></tr> | ||
| − | |||
| − | + | </table> | |
| − | + | ==Cake== | |
| + | We ordered the cake below from Publix on Piedmont Road in Marietta. If you draw up your idea, they can usually do pretty cool stuff with it! In this case they used my drawing, and they used gel icing for the test tubes, the pink liquid and the bubbles. I really need to send these folks a thank-you card for a job well done! | ||
| − | + | [[File:Testtubecake.jpg]] | |
Latest revision as of 19:25, 15 September 2015
My son wanted an "experiment" birthday party, where he and his friends could mix things in test tubes like we do at the kitchen table.
Contents
Invitations
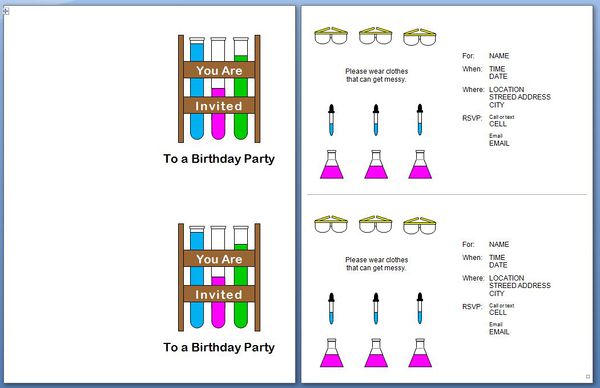
I designed the invitations in MS Word, and printed them double sided on letter sized cardstock, with two invitations per page.
 |
File:Experiment party invitation.docx |
Test Tubes, Containers, Pipettes
| Item | Supplier | Comments |
| Baby Soda Bottle Test Tubes | Home Science Tools | These are soda bottles that haven't yet been vacuum formed into large bottles. They're clear, sturdy, and wash up well. The lids are soda bottle lids, so they're easy to replace if you loose one. The lids that came with these weren't as nice as the lids that came in our science kit versions, but they worked. |
| Self Standing Centrifuge Tubes, 50ml | Frey Scientific through Amazon | These are nice, because they stand up on their own. They'd still be easy enough for kids to tip over, so I still recommend making the diy test tube racks. They're not as clear as the baby soda bottles, but they have ml marks from 5ml to 50ml, which my son liked. |
| Plastic Bowls | Dollar Tree | We used these to mix the slime. I didn't have enough regular bowls to go around, and these came out to $.50/piece. Instead of throwing them away, I'll wash and reuse them with other messy projects. |
| Disposable Pipettes, 1ml | Home Science Tools | These are like flimsy, disposable eye droppers. |
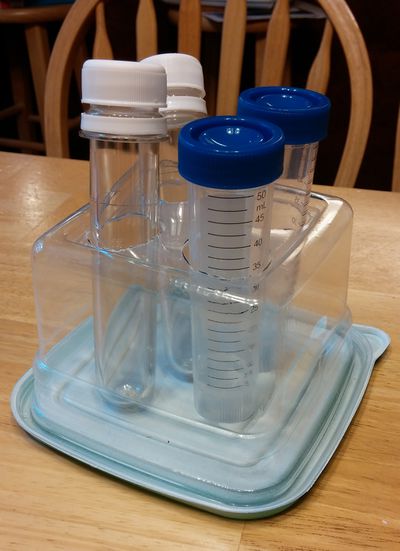
Project: DIY Test Tube Stands
| Item | Supplier | Comments |
| Tall Food Storage Tubs | Dollar Tree | The tubs I used were SureFresh brand, size "tall square." They were clear, around 3 1/2 inches tall, and a three-pack was $1. |
| White Spray Paint | already had | I foolishly bought spray paint for a project that was *much* too large for spray paint, so I had quite a few of these sitting around waiting to be used. I used it to paint the green lids on the food storage tubs. The lids make the test tubes stand/stay much better, but the green color of the lids made it hard to see the liquids in the test tubes, so the white paint came in handy. Alternatively, you could use white paper, but it'll get soggy pretty quickly. |
| Rotary Cutting Tool (Dremel) | already had | Used the rotary cutting disk to cut the holes in the storage containers, and the sander to smooth and round out the edges. Use eye protection and don't let anyone crowd you, because hot melted plastic will fly as you work. |
| Dremel cutting disk | ||
| Dremel sanding barrel | ||
| Eye Protection |
Experiments
| Experiment | Ingredients | Starter recipe | Party recipe | Instructions |
| Sour Milk Test tube, dropper |
Milk | By the drop |
What you'll get: The milk will solidify on contact with the apple juice, and it'll look like pieces of torn up paper towel. You don't want the kids to add to much milk at once, because the whole tube will become a solid mass, and they won't be able to see the white parts are a solid floating in a liquid.
|
|
| Apple juice | Test tube, mostly full | |||
| Fizz 2 test tubes, small pitchers |
Vinegar | 1/4 cup | 2/3 test tube |
What you'll get: The baking soda and vinegar will foam - a lot!
|
| Baking Soda | 2 tablespoons | Kids' choice | ||
| Alka Seltzer Lava Lamp 1 Liter bottle, kids share |
Water | 1/3 of a 2-liter | Few inches in a 1-liter bottle |
What you'll get: This will look a little like a lava lamp. Each Alka Seltzer tablet will last a minute or so, so you'll want to have plenty on hand so the kids can keep it going. They'll of course realize that more is messier, so you may end up with an overflow.
|
| Vegetable oil | 2/3 of a 2-liter | Most of the rest of the bottle | ||
| Food coloring | ||||
| Alka Seltzer (generic fine) | Big box (72 count) | |||
| Slime | Elmer's school glue (some generics don't work | I didn't like the recipe I used. It called for too much borax (3 tsp/cup), so the slime turned pretty solid pretty fast. Even if you added the borax solution slowly, the glue solution that it came in contact with quickly solidified, but the kids still loved it. Since then I found another recipe that called for 1 tsp/cup, but I haven't tested it. | ||
| Warm water | ||||
| Borax | ||||
Cake
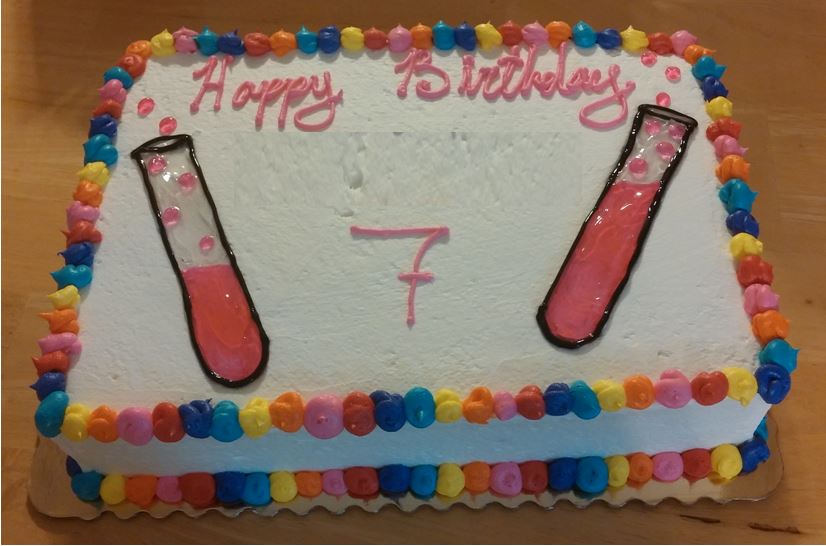
We ordered the cake below from Publix on Piedmont Road in Marietta. If you draw up your idea, they can usually do pretty cool stuff with it! In this case they used my drawing, and they used gel icing for the test tubes, the pink liquid and the bubbles. I really need to send these folks a thank-you card for a job well done!

